Detecting Fail2Ban Bans in Wazuh SIEM Using Custom Decoders and Rules
A practical step-by-step guide for collecting Fail2Ban events, building a custom decoder, creating Wazuh rules, and validating the alert pipeline end to end.
Audience: Wazuh admins, SOC analysts, blue teams, and Linux defenders
Fail2Ban is great at blocking repeated abusive activity such as SSH brute-force attempts, but many teams stop at the ban itself and never forward that security signal into their SIEM. That means the blocking happens on the server, but the SOC does not get clean visibility, correlation, or alerting inside Wazuh.
In this tutorial, we will connect Fail2Ban to Wazuh the right way so that:
- Wazuh detects when an IP is banned
- Wazuh detects when an IP is unbanned
- SSH-related bans can be treated with higher severity
What We Will Build
At the end of this tutorial, your flow will look like this:
- Fail2Ban bans an IP on a Linux server
- The event is written to a Wazuh-collected log source
- Wazuh decodes the event
- Wazuh matches a custom rule
- The alert appears in the Wazuh dashboard and alert logs
Lab Example
This tutorial assumes:
- a Linux server running Fail2Ban and the Wazuh agent (Check the link below for the
Step-by-Step Fail2Ban setup/ configuration)
- a Wazuh manager where custom decoders and rules will be added
- SSH is protected by the
sshdjail
Why Fail2Ban Alerts Sometimes Do Not Show in Wazuh
Before jumping into the setup, here is the most important lesson.
A common reason Fail2Ban rules do not work in Wazuh is a log format mismatch.
For example, Fail2Ban may log into:
``` text /var/log/fail2ban.log
with lines like:

``` text
2026-06-12 11:37:00,197 fail2ban.actions [24092]: NOTICE [sshd] Ban 203.0.113.55
That format is not the same as standard syslog. If your Wazuh decoder depends on program_name such as fail2ban.actions, but Wazuh is reading the file as regular syslog, the pre-decoder may not extract fields the way you expect. The result is simple: the custom rule never fires.
The cleaner approach is to make Fail2Ban log in a syslog-compatible destination that Wazuh already collects.
Step 1: Configure Fail2Ban to Log in a Wazuh-Friendly Format
On the monitored Linux server, open:
nano /etc/fail2ban/fail2ban.confFind this setting:
logtarget = /var/log/fail2ban.logChange it to:
logtarget = SYSLOGThen restart Fail2Ban:
sudo systemctl restart fail2ban
sudo fail2ban-client status
After the restart, confirm that Fail2Ban entries are now visible in syslog:
sudo grep fail2ban /var/log/syslog | tail -n 20You should see lines similar to:
2026-06-12T13:02:24.914836+08:00 alistoir-prod fail2ban.actions[176447]: NOTICE [sshd] Ban 203.0.113.55
2026-06-12T13:02:27.047146+08:00 alistoir-prod fail2ban.actions[176447]: NOTICE [sshd] Unban 203.0.113.55
Step 2: Make Sure the Wazuh Agent Collects the Right Log Source
On the monitored server, your Wazuh agent should collect either:
journald/var/log/syslog- or both
A common working setup looks like this:
<localfile>
<log_format>journald</log_format>
<location>journald</location>
</localfile>
and/or:
<localfile>
<log_format>syslog</log_format>
<location>/var/log/syslog</location>
</localfile>
If you manage agents centrally, this can also be placed in shared agent.conf.
After updating the agent config, restart the Wazuh agent:
sudo systemctl restart wazuh-agentStep 3: Create the Fail2Ban Decoder on the Wazuh Manager
On the Wazuh manager, create:
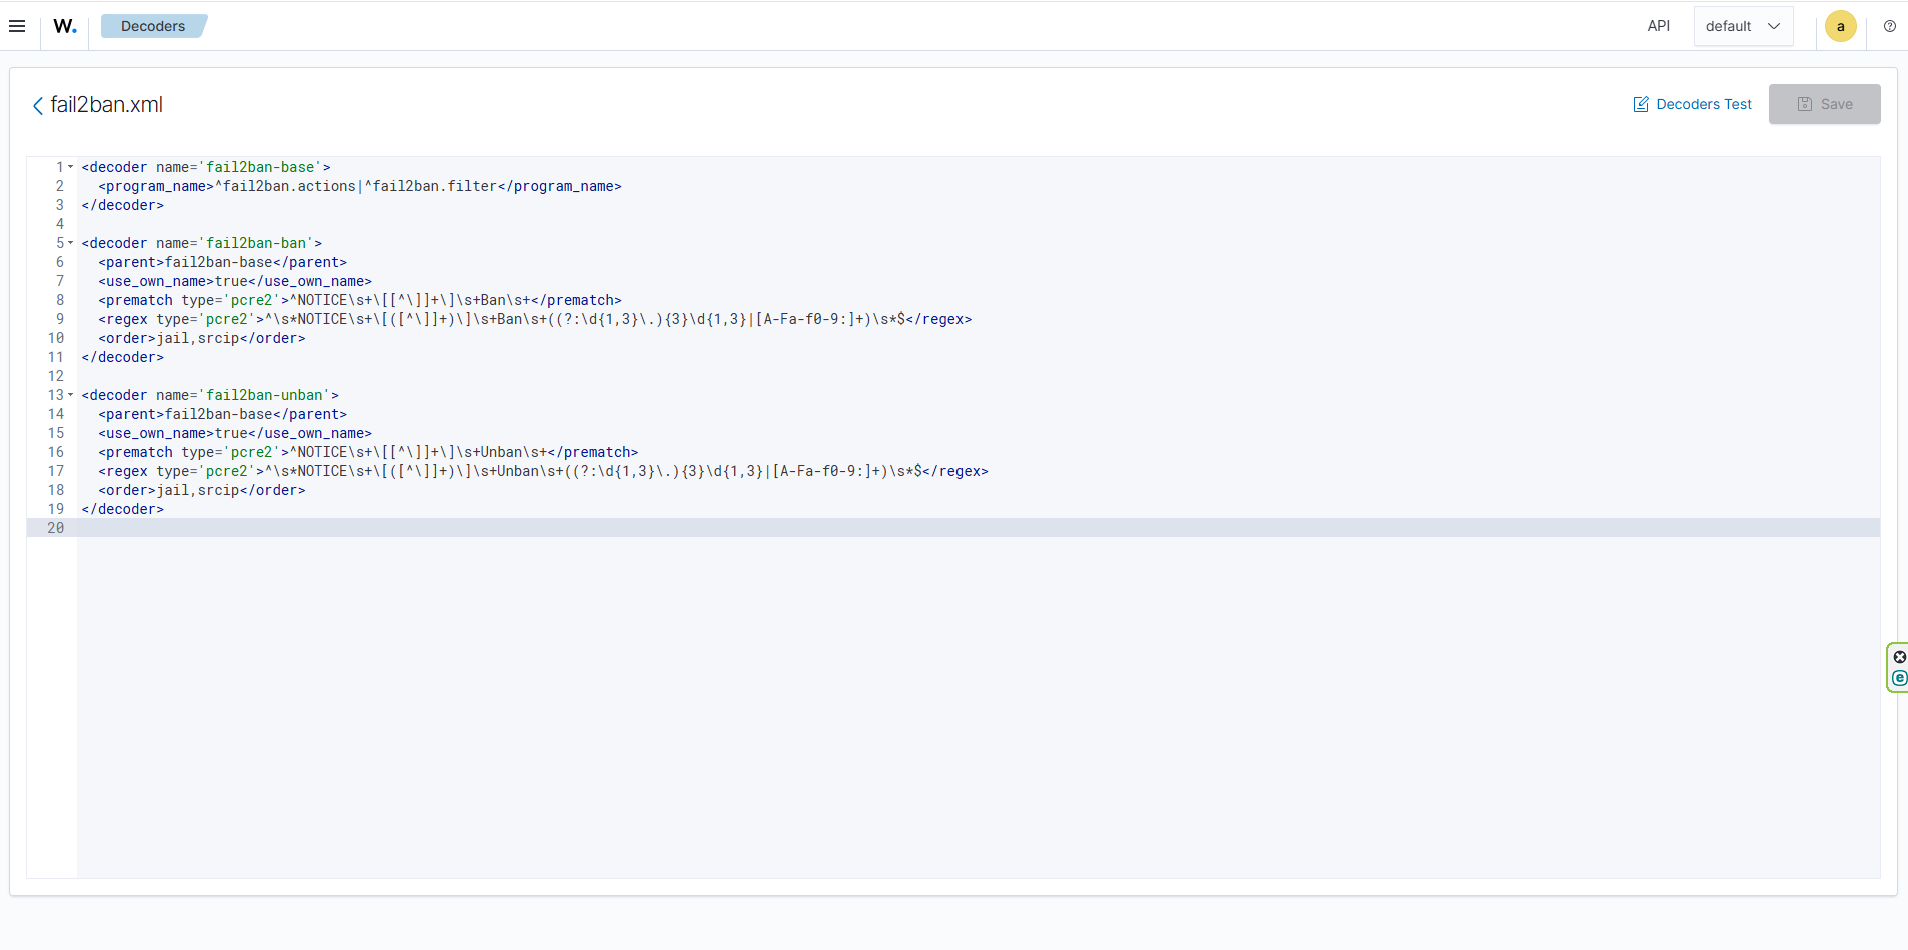
nano /var/ossec/etc/decoders/fail2ban.xmlUse the following decoder:
<decoder name="fail2ban-base">
<program_name>^fail2ban.actions|^fail2ban.filter</program_name>
</decoder>

<decoder name="fail2ban-ban">
<parent>fail2ban-base</parent>
<use_own_name>true</use_own_name>
<prematch type="pcre2">^NOTICE\s+\[[^\]]+\]\s+Ban\s+</prematch>
<regex type="pcre2">^\s*NOTICE\s+\[([^\]]+)\]\s+Ban\s+((?:\d{1,3}\.){3}\d{1,3}|[A-Fa-f0-9:]+)\s*$</regex>
<order>jail,srcip</order>
</decoder>

<decoder name="fail2ban-unban">
<parent>fail2ban-base</parent>
<use_own_name>true</use_own_name>
<prematch type="pcre2">^NOTICE\s+\[[^\]]+\]\s+Unban\s+</prematch>
<regex type="pcre2">^\s*NOTICE\s+\[([^\]]+)\]\s+Unban\s+((?:\d{1,3}\.){3}\d{1,3}|[A-Fa-f0-9:]+)\s*$</regex>
<order>jail,srcip</order>
</decoder>
What This Decoder Does
fail2ban-basematches events where the process name isfail2ban.actionsorfail2ban.filterfail2ban-banextracts the jail name and source IP for ban eventsfail2ban-unbanextracts the jail name and source IP for unban events
Step 4: Create the Wazuh Rules
On the Wazuh manager, create:
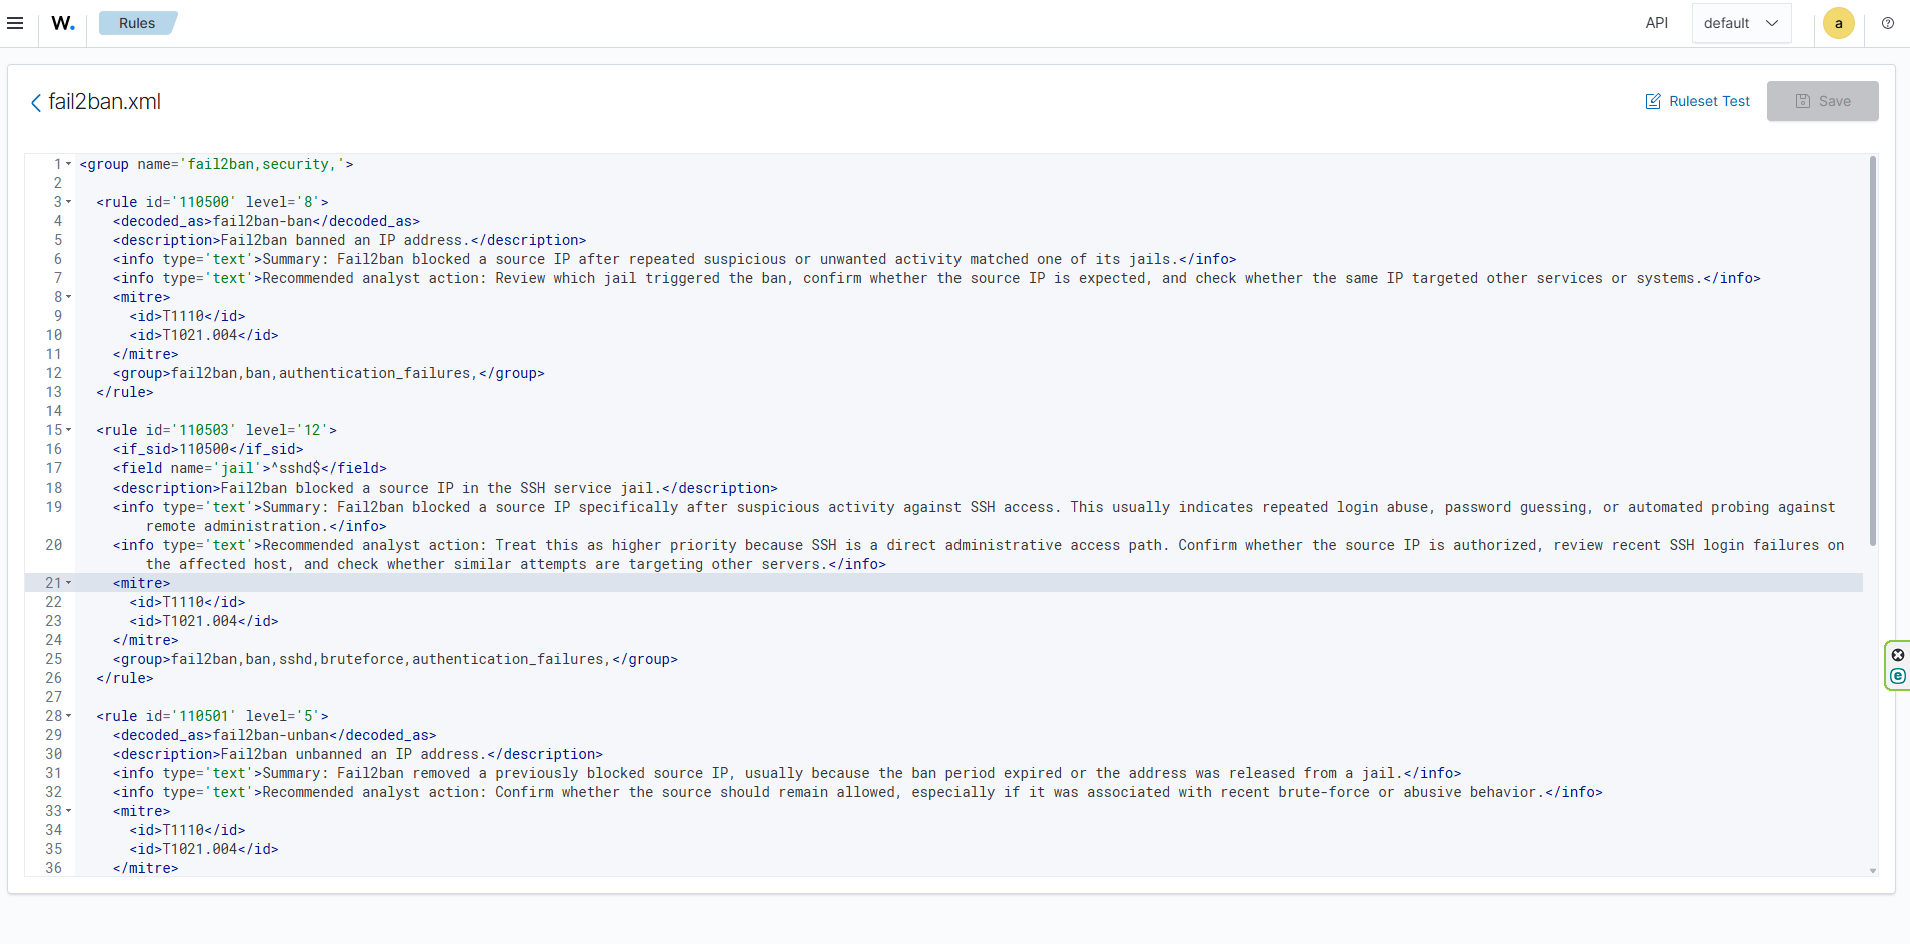
nano /var/ossec/etc/rules/fail2ban.xmlUse these rules:
<group name="fail2ban,security,">
<rule id="110500" level="8">
<decoded_as>fail2ban-ban</decoded_as>
<description>Fail2ban banned an IP address.</description>
<group>fail2ban,ban,authentication_failures,</group>
</rule>

<rule id="110503" level="12">
<if_sid>110500</if_sid>
<field name="jail">^sshd$</field>
<description>Fail2ban blocked a source IP in the SSH service jail.</description>
<group>fail2ban,ban,sshd,bruteforce,authentication_failures,</group>
</rule>

<rule id="110501" level="5">
<decoded_as>fail2ban-unban</decoded_as>
<description>Fail2ban unbanned an IP address.</description>
<group>fail2ban,unban,authentication_failures,</group>
</rule>

<rule id="110502" level="10" frequency="5" timeframe="300" ignore="300">
<if_matched_sid>110500</if_matched_sid>
<description>Multiple Fail2ban bans detected within 5 minutes.</description>
<group>fail2ban,multiple_bans,bruteforce,authentication_failures,</group>
</rule>

<rule id="110504" level="14" frequency="5" timeframe="300" ignore="300">
<if_matched_sid>110503</if_matched_sid>
<description>Multiple SSH-related Fail2ban bans detected within 5 minutes.</description>
<group>fail2ban,multiple_bans,sshd,bruteforce,authentication_failures,</group>
</rule>
</group>
Why These Rules Are Useful
110500catches any Fail2Ban ban event110503raises severity when the jail issshd110501tracks unban events110502and110504help identify bursts of abuse
This gives you both visibility and prioritization.
Step 5: Restart the Wazuh Manager
After adding the decoder and rules, restart the manager:
sudo systemctl restart wazuh-managerOr, depending on your environment:
sudo /var/ossec/bin/wazuh-control restartStep 6: Test the Setup Safely
A safe way to test without waiting for a real attacker is to use a documentation IP address.
Run:
sudo fail2ban-client set sshd banip 203.0.113.55
sleep 2
sudo fail2ban-client set sshd unbanip 203.0.113.55
Then check the Wazuh manager alerts:
sudo grep -Rni '203.0.113.55' /var/ossec/logs/alerts/alerts.log /var/ossec/logs/alerts/alerts.jsonIf everything is working, you should see matches similar to:
Rule: 110503 (level 12) -> 'Fail2ban blocked a source IP in the SSH service jail.'
Src IP: 203.0.113.55
and:
Rule: 110501 (level 5) -> 'Fail2ban unbanned an IP address.'
Src IP: 203.0.113.55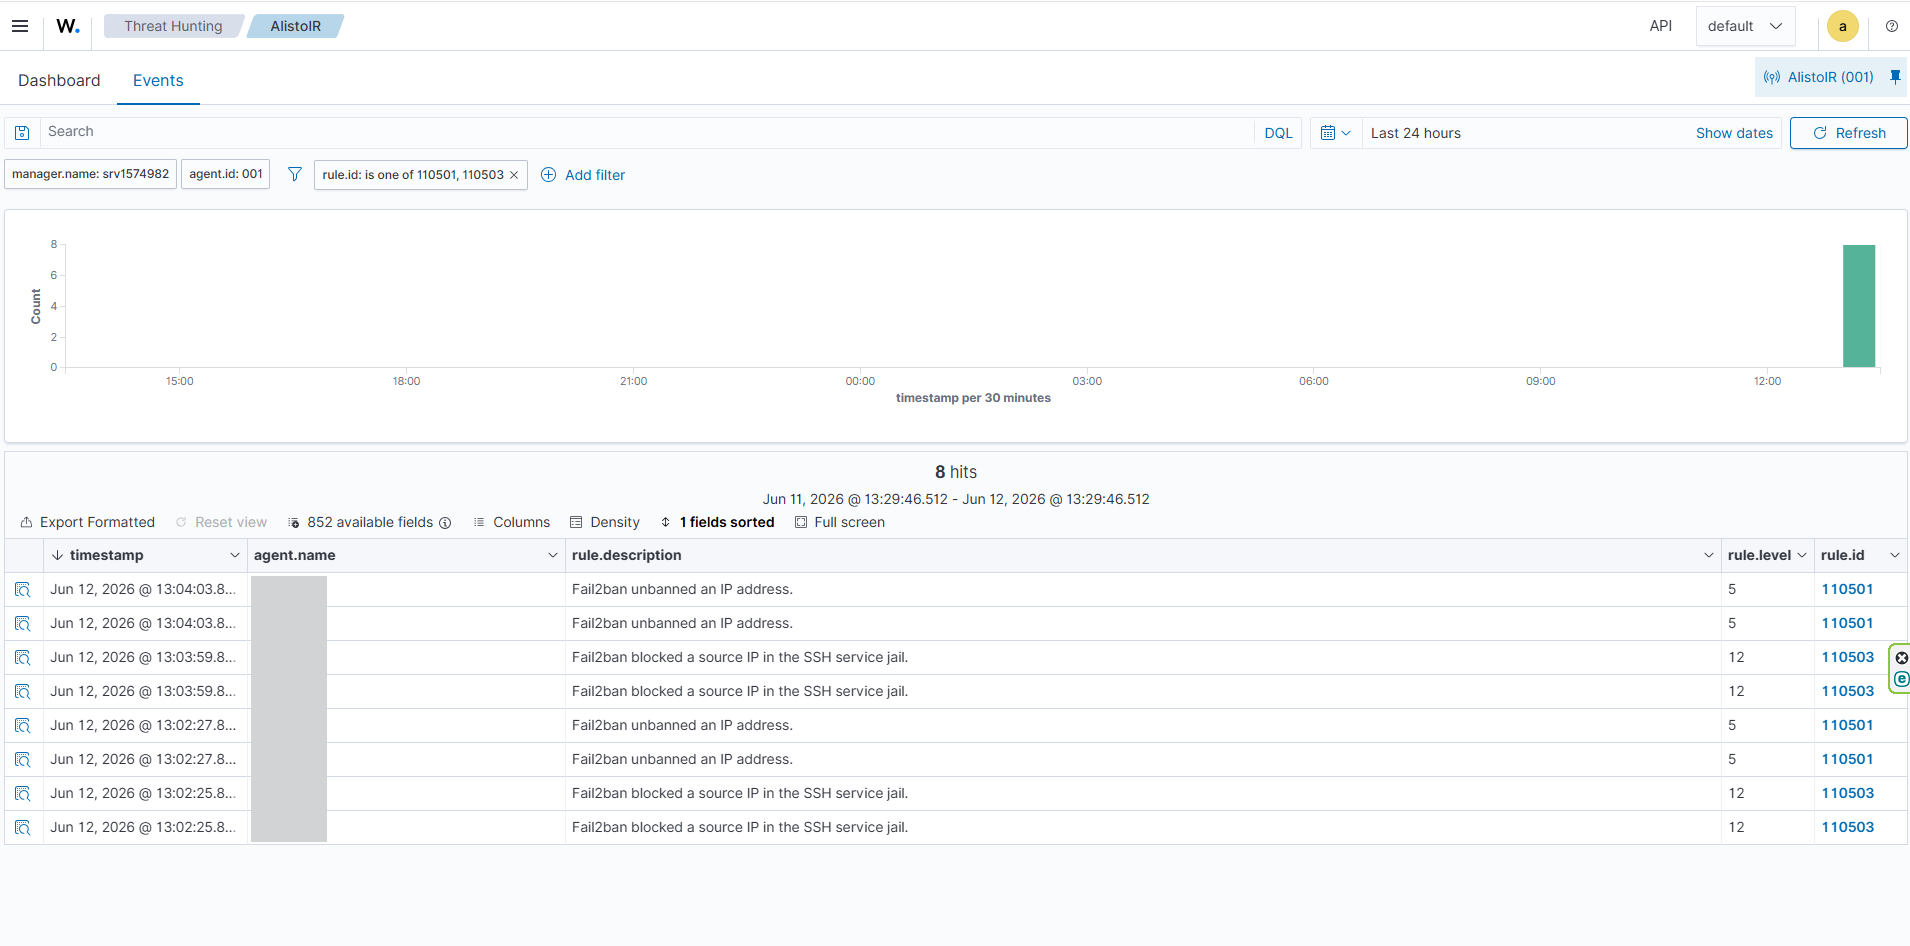
Step 8: Validate the Fail2Ban Alert in AlistoIR
After confirming that Wazuh successfully detects the Fail2Ban ban event, the next step is to validate that the alert is also visible inside AlistoIR.
This is important because Wazuh confirms that the security event was detected, while AlistoIR helps the SOC team investigate, document, enrich, and respond to the incident in a structured way.
In this example, the Fail2Ban event was generated when the sshd jail blocked the source IP address 203.0.113.55. Wazuh matched the event using the custom Fail2Ban decoder and rule, and then the alert was forwarded to AlistoIR for investigation.
Expected AlistoIR Output
Inside the AlistoIR dashboard, the Fail2Ban alert should appear in the alert queue or incident investigation view.
The alert should show important details such as:
- Alert title or rule description
- Severity level
- Source IP address
- Affected Linux server or Wazuh agent
- Wazuh rule ID
- Jail name, such as sshd
- Raw event or related log evidence
- Timestamp of the ban event
Example alert details:
Alert Name: Fail2ban blocked a source IP in the SSH service jail
Rule ID: 110503
Severity: High
Source IP: 203.0.113.55
Jail: sshd
Event Type: Fail2Ban Ban
Status: New / Queued
Source: Wazuh
AlistoIR Dashboard Screenshot
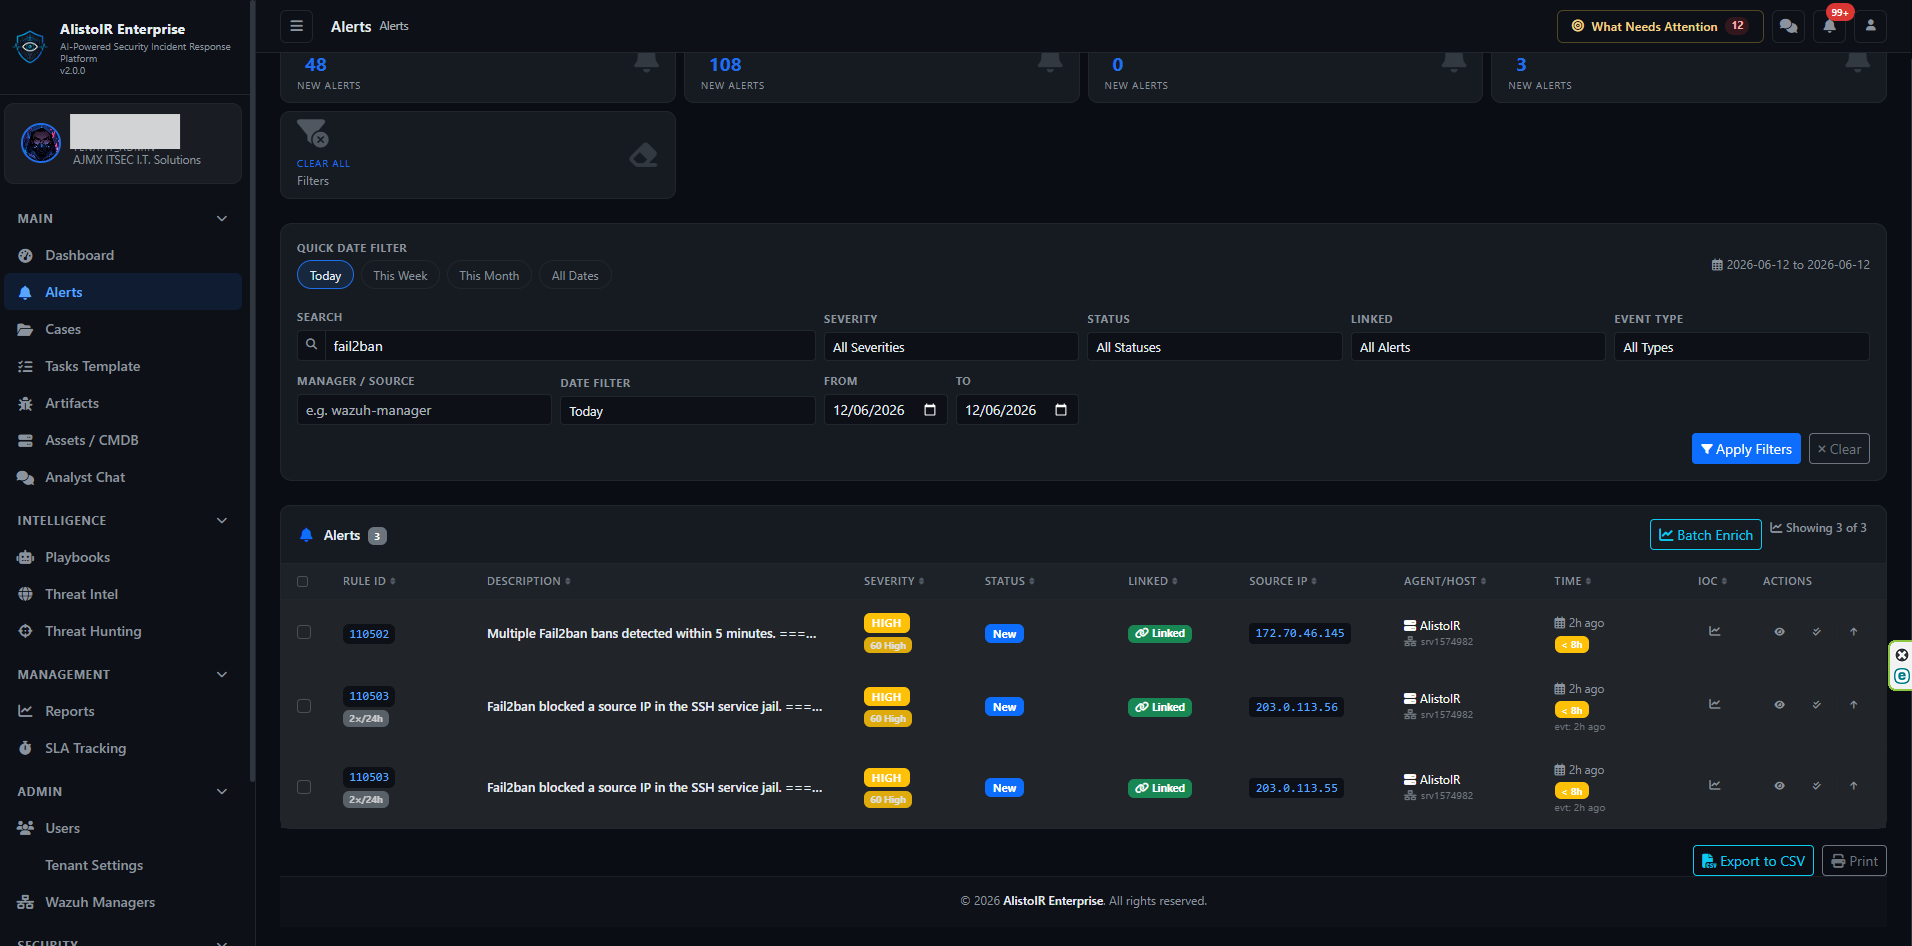
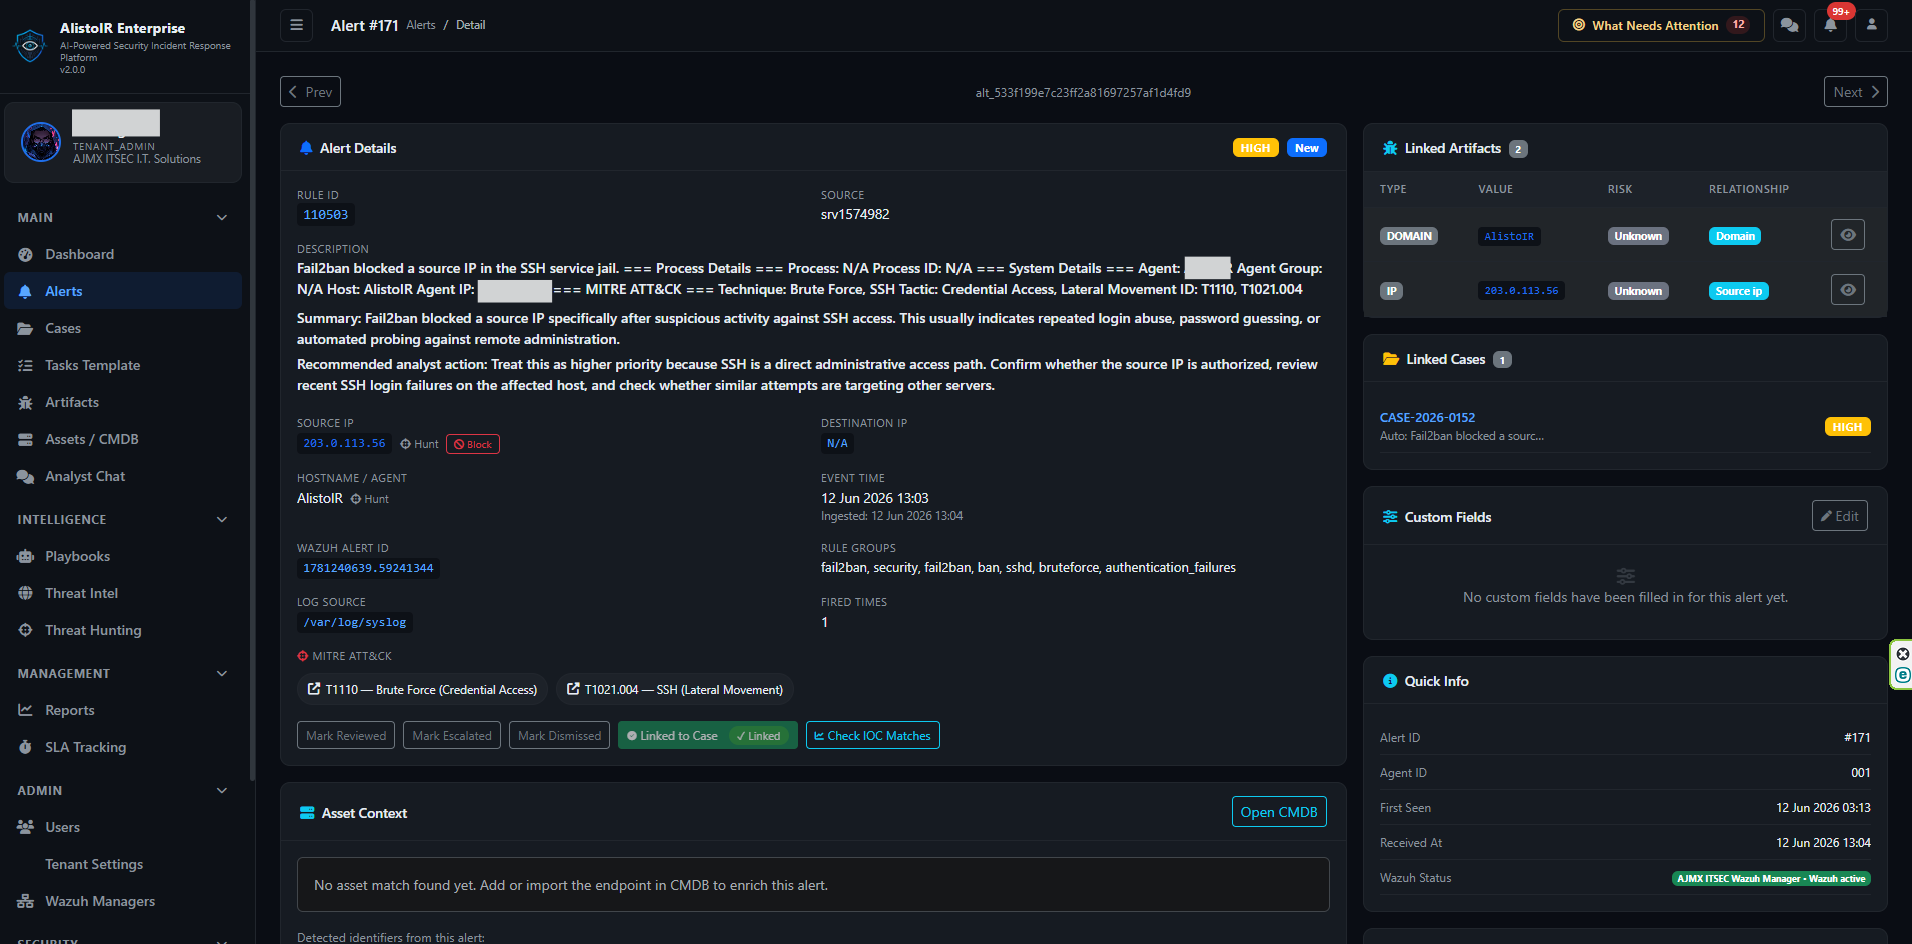
Figure: AlistoIR dashboard showing the Fail2Ban alert generated from a Wazuh custom rule.
The screenshot clearly shows that the Fail2Ban alert was successfully ingested into AlistoIR. This helps prove that the full detection pipeline is working from Linux server logs, to Wazuh decoding and rules, and finally to AlistoIR alert visibility.
What to Check in AlistoIR
When reviewing the alert in AlistoIR, validate the following:
- The alert title matches the Wazuh rule description.
- The source IP is correctly extracted.
- The affected host or agent name is visible.
- The severity is mapped properly.
- The raw log or evidence is available for review.
- The alert can be investigated, documented, and escalated if needed.
If the alert is visible in Wazuh but not in AlistoIR, check the Wazuh-to-AlistoIR forwarding configuration, the API key, the endpoint URL, and the ingestion logs.
Final Validation Flow
Once everything is working, the complete flow should look like this:
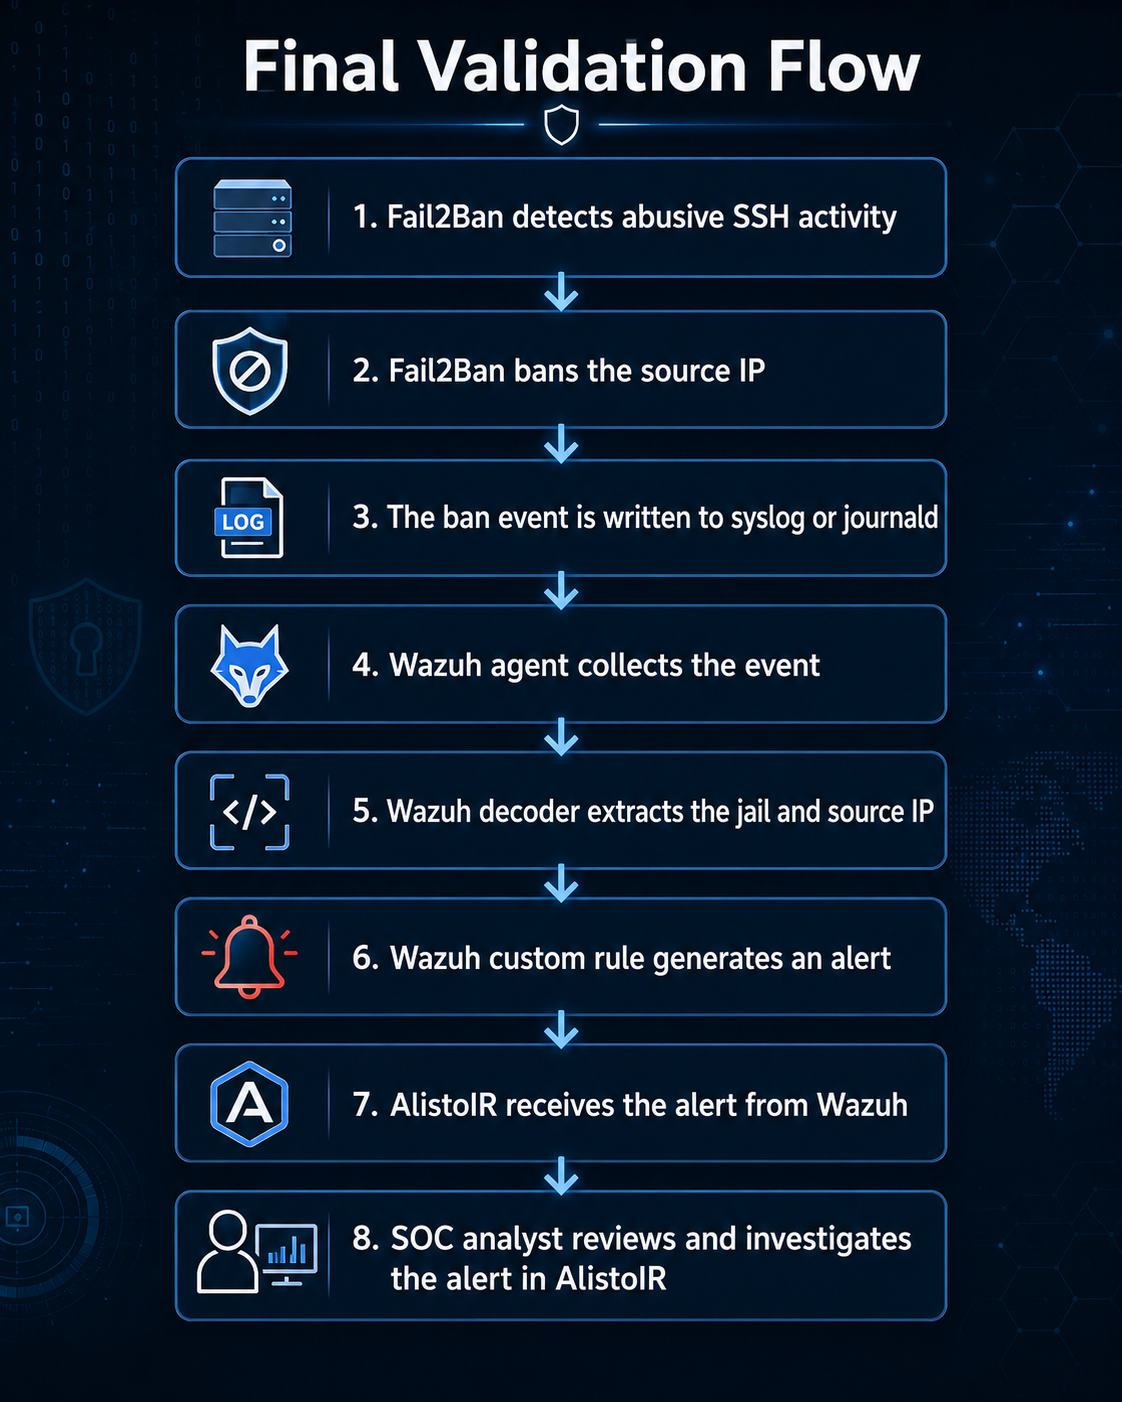
This confirms that Fail2Ban is not only blocking attacks locally but also producing useful security visibility for the SOC team through Wazuh and AlistoIR.
Troubleshooting Tips
If the rules still do not fire, check these items first:
1. Fail2Ban is logging to the wrong place
If Fail2Ban is still writing only to /var/log/fail2ban.log, your decoder may not match as expected.
2. Wazuh is not collecting the correct source
Make sure the agent is actually collecting journald or /var/log/syslog.
3. The process name is different
Your decoder expects:
fail2ban.actionsfail2ban.filter
If your distribution logs a different process name, update the decoder accordingly.
4. Duplicate alerts appear
If you collect both journald and /var/log/syslog, you may see the same event twice. This is normal if both sources contain the same message. If you want cleaner alerts, choose one main source for Fail2Ban visibility.
Recommended Production Tips
- Keep custom decoders and rules clearly named and documented
- Use a dedicated ID range for your organization
- Raise severity for service-specific jails like
sshd - Test with known safe IPs before relying on the alert in production
Final Thoughts
Fail2Ban is already doing useful defensive work on many Linux servers, but integrating it into Wazuh gives your team much better visibility. Once the logs are normalized correctly and the decoder is aligned with the actual log format, Wazuh can turn simple local bans into actionable SIEM alerts.
The biggest takeaway is this: always verify the real log format first. Most Fail2Ban-to-Wazuh issues are not caused by the rule logic itself, but by the log source and parsing path.
If you build the pipeline carefully, the result is simple, reliable, and very effective for SSH brute-force monitoring.