Step‑by‑step tutorial on how to secure Linux Server from bruteforce attack with fail2ban
Description:
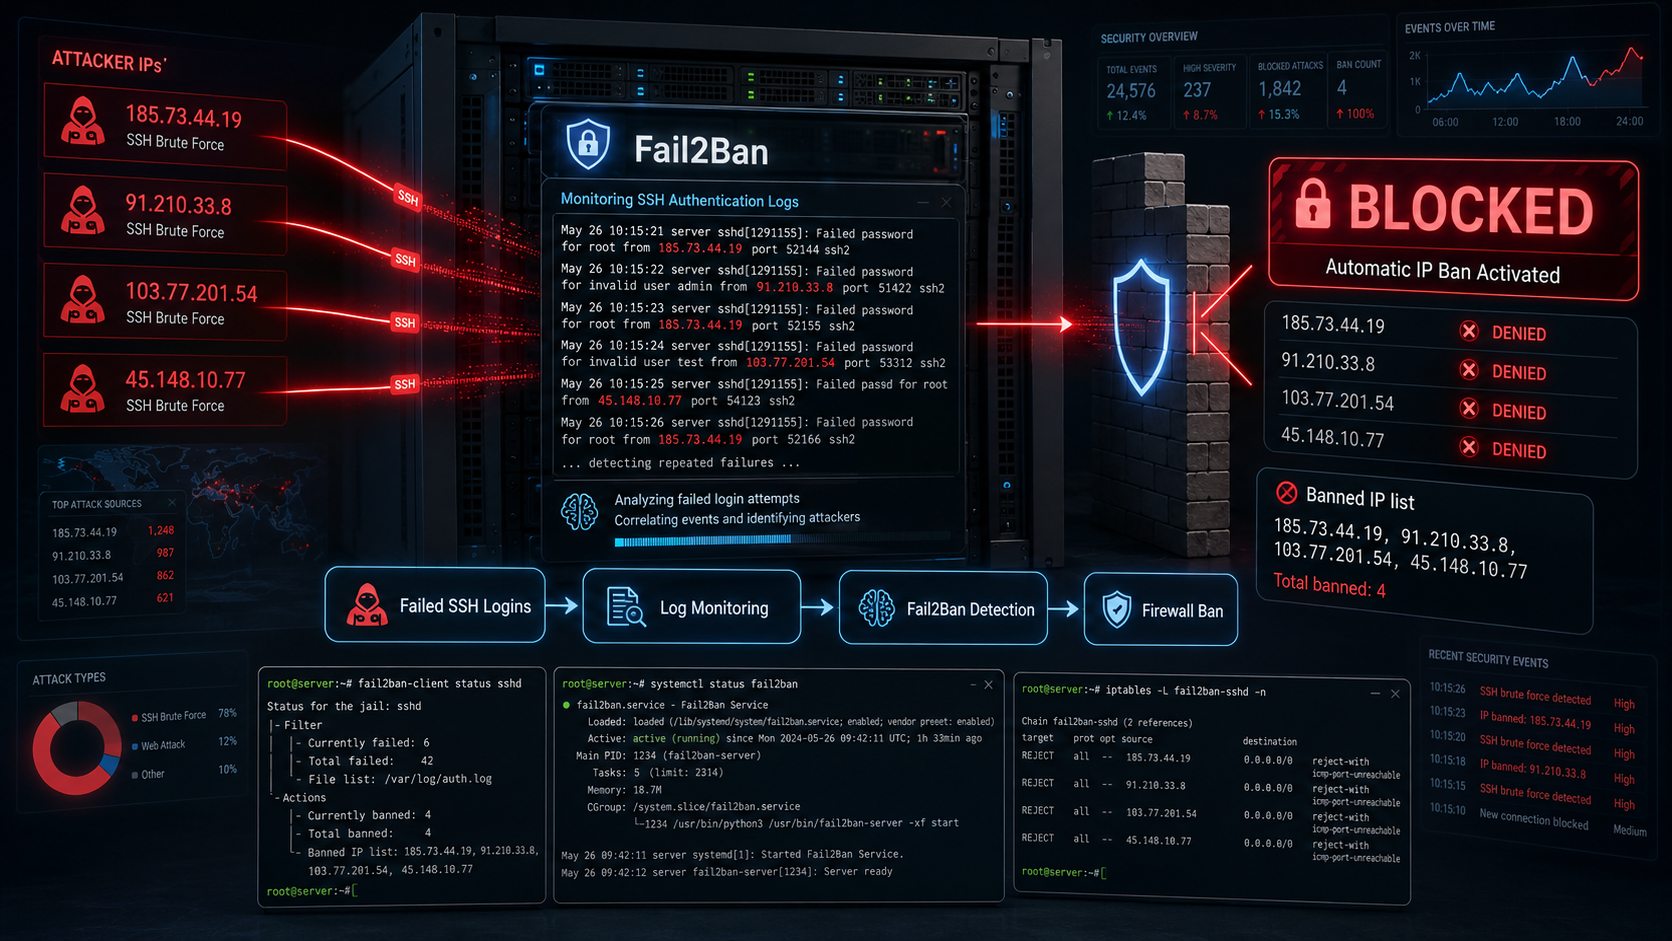
Fail2Ban is a lightweight intrusion-prevention tool that monitors logs for suspicious activity (like repeated login failures) and automatically blocks the attacker’s IP using the firewall (iptables, nftables, firewalld, etc.). This tutorial explains how to configure fail2ban to protect the Linux serever from bruteforce attacks.
---
Basic Concepts:
Fail2Ban works in three main steps:
Log monitoring
      ↓
Pattern detection (failed logins, attacks)
      ↓
Automatic firewall block of attacker IP
Example scenario:
Attacker tries 5 wrong SSH passwords
      ↓
Fail2Ban detects failures in logs
      ↓
IP is banned using iptables
How Fail2Ban Detects Attacks
Fail2Ban continuously scans system log files such as:
/var/log/auth.log
/var/log/secure
/var/log/apache2/error.log
Example log it detects:
sshd[1291155]: Failed password for root from 34.75.226.120 port 50234 ssh2Create jail.local
Create a custom configuration file:
sudo nano /etc/fail2ban/jail.localAdd minimal configuration to protect SSH then save:
[sshd]
enabled = true
port = ssh
logpath = /var/log/auth.log
maxretry = 5
findtime = 600
bantime = 3600
Explanation:
| Setting | Meaning |
|---|---|
| enabled | Enable protection |
| maxretry | Number of failed attempts allowed |
| findtime | Time window to count failures |
| bantime | How long the IP is blocked |
Restart Fail2Ban
After saving the file:
sudo systemctl restart fail2banVerify it started:
sudo systemctl status fail2banVerify the Jail
Check active jails:
sudo fail2ban-client statusExample output:
Status
|- Number of jail: 1
`- Jail list: sshd
Check Banned IPs
sudo fail2ban-client status sshdExample:
Banned IP list: 34.75.226.120Important: Log Path Differences
Depending on the Linux distribution:
| OS | SSH Log |
|---|---|
| Ubuntu / Debian | /var/log/auth.log |
| CentOS / RHEL | /var/log/secure |
| Rocky / Alma | /var/log/secure |
Check Fail2Ban Logs
sudo tail -f /var/log/fail2ban.logImportant Safety Tip
Before enabling Fail2Ban, whitelist your own IP to avoid locking yourself out:
Edit:
nano /etc/fail2ban/jail.localAdd:
ignoreip = 127.0.0.1/8 #Your IP either Private or PublicExample of ignoring multiple IPs
ignoreip = 127.0.0.1/8 ::1 192.168.1.10 192.168.1.11 10.0.0.5| IP | Meaning |
|---|---|
127.0.0.1/8 | Localhost |
::1 | IPv6 localhost |
192.168.1.10 | Trusted internal IP |
192.168.1.11 | Another admin IP |
10.0.0.5 | Monitoring server |
These IPs will never be blocked.
Example Real Configuration
Example for a production server:
ignoreip = 127.0.0.1/8 ::1 192.168.1.0/24 10.0.0.0/24 203.0.113.15Meaning:
- Localhost
- Internal network
- Admin public IP